
Do-it-yourself maintenance number six! Chain sprocket replacement! (According to 2020 Webike)
If you buy a chain online and take it to a general goods store, the labor charge will be 6,000 yen for a chain replacement and 8,000 yen for a sprocket replacement.
It costs a lot of money in exchange for safety and security. But with DIY, the labor cost is zero!
At first glance, it may seem difficult to change a chain, but in fact, if you have the right tools and a few tricks, you can do it in a snap!
In this article, our former mechanic staff will explain how to change the chain!
- Introducing this year's lecturer and vehicle
- Tools to be used
- Chain/Sprocket replacement DIY lesson! Work flow
- Removing the old chain
- Replacing the rear sprocket
- Replace the front sprocket
- Install the chain
- Adjusting the chain tension
- Finished!
- The Sunstar chain used in this post is on sale right now for +10% points!
Introducing this year's lecturer and vehicle

Yasuo, Webike's best mechanic, will teach us how to change the chain and sprocket.
Mr. Yasuo used to be a mechanic, and in recent years he has also been involved in product impressions, making him a true professional!

The vehicle used is a Suzuki Bandit 400, and due to its age and storage conditions, the chain is in need of replacement.

The chain to be replaced is the latest 2021 Sunstar chain and sprockets.
This time we are using a 3-piece set that is geeky and easy to choose.
Tools to be used
- Maintenance Stand
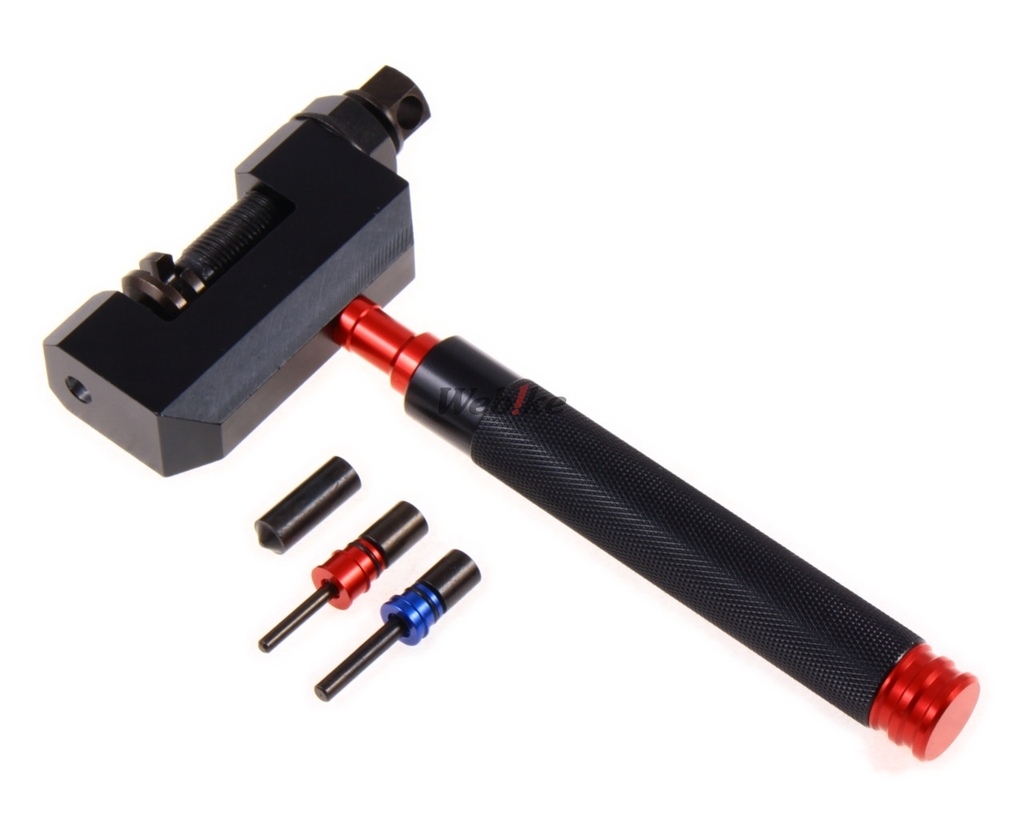
- chain tool
- Wrenches for use with chain tools
- Various wrenches, hexagon, etc.
- vernier micrometer
- torque wrench
If you only want to change the chain, you can do without it, but it is useful to have it.
Also known as a chain cutter. It is used for chain cutting and caulking during installation.
In this work, we used the one made by DRC.
Most chain tools are designed to turn bolts with a wrench or hexagon, so be prepared to use the right tool.
Used to remove sprocket covers, etc.
Since the required tools vary depending on the vehicle, please check the vehicle beforehand.
Used to check for proper caulking when caulking a chain.
Essential item for sprocket replacement off the wheel.
Chain/Sprocket replacement DIY lesson! Work flow

チェーン・スプロケット交換の流れは以下の通り!
- 古いチェーンを取り外す
(If you only want to change the chain, go to 6) - Remove the wheel
- Replacing the rear sprocket
- Replace the front sprocket
- ホイールを取り付ける
- 新しいチェーン取り付ける
(Press-fitting and caulking work) - Chain tension adjustment
The process is divided into these 7 major steps. If you only need to replace the chain, it's 3 steps!
The work time is 2 to 3 hours if the chain and sprocket are replaced.
If it's just a chain, it should take about an hour.
Now let's get down to the actual work!
Removing the old chain
First, remove the old chain.
The chain joint may be of the clip type for small displacement vehicles such as the Cub, but in this case we will remove the caulked joint which is common for 250 cc and larger.
(In this case, I removed it from the rear sprocket first, but you can work on it while it is still attached to the rear sprocket.)

Use the chain tool to remove the caulk joint chain.
The chain cutter is a tool that cuts the chain by pushing the chain pins out from the side and pulling them out.

Set the cutter pin of the chain tool and align it with the pin part of the chain body.
The preferred position to cut is at the joint, but another part is also acceptable.

Then turn the large bolt to position the chain and chain tool.

Finally, by turning the small bolt at the back, the chain tool's cutter pin pushes the pin out of the chain body, allowing the chain to be cut.
At this time, the cutter pin must catch the center of the pin of the chain vertically. If it is misaligned, the cutter pin may break.

Turn the bolt slowly until the pin comes out.

If you're only replacing the chain, we'll install the new chain right after this, so proceed to install the chain!
If you are also replacing the front sprocket, you can pull out the cut chain.
Replacing the rear sprocket
Remove the wheel

When replacing the sprocket, the rear wheel must be removed.
The rear wheel can be removed by removing a nut called an axle nut and pulling out the axle shaft.
The trick is to loosen the axle nut a little when the bike is on the ground, because in many cases the axle nut is held in place by a strong force.

The details are beyond the scope of this article, so if you want to know more, please refer to the article below!

Replacing the rear sprocket

The removed rear wheel has a brake disc and sprocket, so do not place it directly on the ground.
Start the work on the disused tire etc.

The sprocket is fixed to the wheel with a nut and bolt as shown in the image, so it can be removed by removing this bolt.

The trick is to tighten the bolts on a diagonal line when installing. In this case, it is connected with five bolts, so we will skip one bolt and tighten it.
Use a torque wrench to tighten the screws to the specified torque.

One point!
While you've got it off, I'd recommend cleaning it up and replacing all the stock parts like bolts and hub dampers with new ones!
Especially the bolts that hold the sprocket in place, they're more noticeable on a clean sprocket, so I'd be more than happy with a new one!
By the way, I've got new OEM parts on this Bandit that cost roughly under $2,000!
Once the rear sprocket is correctly installed, assemble the wheel in the opposite direction from when it was removed.
Replace the front sprocket

The front sprocket is covered by a cover, so remove this cover first.
When removed, it can be found at .......Wow, very dirty.
It is filled with all kinds of dirt, including dirt that was on the chain.

There are several types of sprocket fixing methods, such as the type where the center of the sprocket is fixed with a nut, the type where it is fixed with a snap ring, and the type where a special fixture is attached to the sprocket with two bolts for small displacement models such as the Cub.
This time it was held in place by a snap ring, so I used a pair of snap ring pliers to spread it out... and remove it!

Once the sprocket is removed, use a parts cleaner and brush to clean the accumulated dirt.

Once it is clean, install the sprocket.

At this time, the bolts and snap rings used should also be replaced with new ones.
In the case of bolts, be sure to tighten them to the specified torque.
#gallery-1 {margin: auto;}#gallery-1 .gallery-item {float: left;margin-top: 10px;text-align: center;width: 50%;}#gallery-1 img {border: 2px solid #cfcfcf;}#gallery-1 .gallery-caption {margin-left: 0;}/* see gallery_shortcode() in wp-includes/media.php */

- table (e.g. Table 1)

- back

By the way, snap rings have a front and back. The one with the sharp corners is the back side, and the smooth side is the front side. And be sure to insert the snap ring into the specified groove.
Install the chain

Now it's time to install the chain.
If you are only replacing the chain, you can attach the chain to the front sprocket by connecting the end of the new chain to the cut end of the old chain and pulling.
Hang the chain on the front side sprocket, even if the chain has already been removed. In both cases, I recommend that you try to match end to end on the rear sprocket.
Also, loosening the chain adjuster beforehand will make it easier to align the ends of the chain with the ends of the chain.
Grease the joint.

Grease the joints where the chain connects.
The caulk joint consists of a plate with a pin, a plate without a pin, and a seal.
Apply the supplied grease to the required areas before starting the installation.

At this time, the O-ring part should be applied around the part that contacts the chain plate. This is the area where the grease will be sealed when the chain is installed.

On the other hand, the side of the seal is the part that is still exposed after the chain is installed.
After applying grease to the pin and inserting it from the back side of the chain, apply grease to the rest of the seal and sandwich it between the plates.

The Sunstar chain O-ring we used this time was the X-ring type with a groove on the inside of the ring.
This type of seal is durable and resistant to twisting, and prevents grease loss.
indentation
After this, the chain is press-fitted and then caulked.
In both cases, the chain tool is used.

First, reassemble the parts of the chain tool to the holder type.

When the tool is ready, insert the joint part you just made.
When pressed in, the pin of the joint inserted from the back side pops out to the front side.
Therefore, the grooves and holes in the holder on the front side should be aligned with the holes in the chain.

Press-fitting is done by tightening the bolts of the chain tool.
Be very careful not to press-fit the joint too tightly in this operation.
It is a good idea to use calipers to check that the thickness is equal to the surrounding area.
Too much press-fit will result in over-tightening in that area, which will prevent the chain from moving flexibly.
Be careful not to press-fit too hard! Try to measure with calipers.
standoff (mechanical fastener)

After press fitting is completed, caulking is done.
If you look at the center of the pin that popped out when it was pressed in earlier, you will see a depression.
This depression can be caulked by pushing it open with a conical caulking pin.

First, replace the parts of the chain tool with caulking pins.
The amount of protrusion of the caulking pin varies depending on the tool, but it should be roughly as shown in the image.

Then sandwich the chain, but be sure to adjust the center of the caulking pin so that it matches the center of the pin in the joint.
As before, by tightening the bolt, the caulking pin moves to the back and is caulked.

The left side of the image is already caulked. The right side is before caulking.
If both pins are caulked correctly, you are done.
Adjusting the chain tension

Finally, adjust the tension to achieve the specified level.
The amount of deflection has a set value for each vehicle, so use that as a reference.
If you don't know the numbers, don't make it taut, but make sure the suspension is still deflecting at full bottom.
Also, the chain adjuster should be adjusted equally on both sides.
When adjustment is complete, tighten the axle shaft to the specified torque.
Please refer to the following article for more information about tension adjustment.


The most common way to adjust the tension is to insert a tool into the sprocket to eliminate the play in the adjuster.
Finished!

And that's it for the chain/sprocket replacement job!
It looks so much nicer now! I'm extremely pleased with the new bolts and everything!

Chain replacement is relatively easy with the correct use of special tools.
This is an easy maintenance to work on because there are no situations that require strength or advanced techniques.
It is said that the chain should be replaced between 10,000km and 30,000km of travel.
Sprockets should be used at the same time as the chain, or once every two chain changes.
The trick to making your replacement chain last is daily maintenance! Let's make sure we maintain this shine for you!
The Sunstar chain used in this post is on sale right now for +10% points!

The Sunstar chain I used in this post is up for grabs right now for 10% off points!
If you're looking to change your chain for summer touring, Sunstar is the way to go!

Color: Gold, Silver, Standart
Chain size: 520, 525, 530
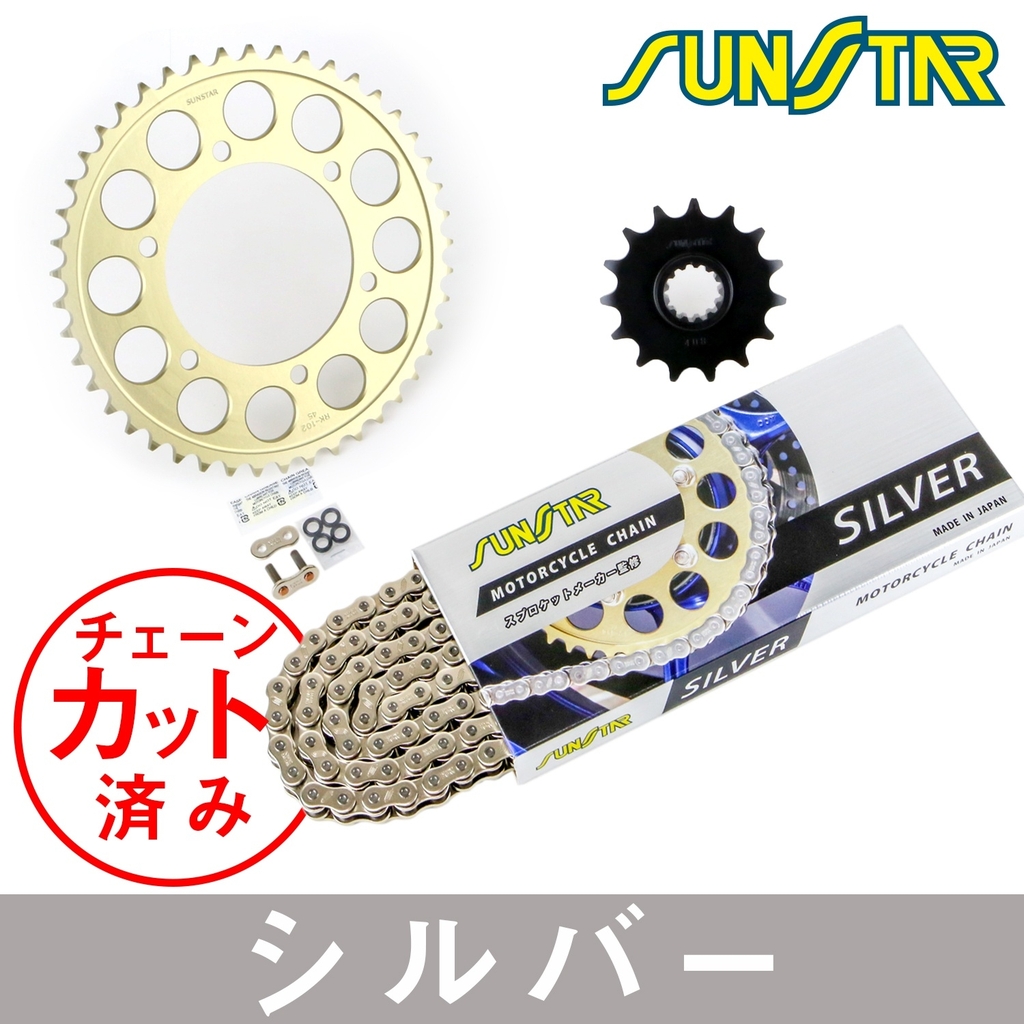
All you have to do is choose a model and color!
You can save about 20% compared to buying a single item.
●Chain and sprocket are well-matched
Applicable size: 420 / 428 / 520 / 525 / 530
Capable of three operations: cutting, press fitting of plates, and crimping

